Installing a downdraft table is a crucial step in creating a cleaner, safer, and more efficient woodworking environment. Whether you're a professional craftsman or a passionate DIY enthusiast, a properly installed downdraft table can significantly reduce dust and improve air quality in your workspace. This comprehensive guide will walk you through the process of installing your downdraft table, ensuring you get the most out of this essential piece of equipment.
From selecting the right location to connecting the dust collection system, we'll cover every aspect of the installation process. By following this step-by-step guide, you'll be able to set up your downdraft table with confidence, maximizing its effectiveness and enhancing your woodworking experience.
Before we dive into the specifics, it's important to understand that installing a downdraft table requires careful planning and attention to detail. The success of your installation will depend on factors such as the size of your workspace, the power of your dust collection system, and the type of projects you typically undertake. With this in mind, let's explore the key steps involved in installing your downdraft table.
A properly installed downdraft table can capture up to 95% of airborne dust particles, significantly improving air quality and reducing health risks associated with prolonged exposure to wood dust.
What considerations should you make before starting the installation?
Before you begin the installation process, it's crucial to carefully consider several factors that will impact the effectiveness and efficiency of your downdraft table. Taking the time to plan and prepare will ensure a smooth installation and optimal performance.
One of the primary considerations is the location of your downdraft table. You'll need to choose a spot that's easily accessible and integrates well with your existing workflow. Consider the proximity to your dust collection system and power sources, as well as the available space for maneuvering large workpieces.
Another important factor is the size and capacity of your dust collection system. Your downdraft table will only be as effective as the system it's connected to, so ensure that your dust collector can handle the additional airflow requirements.
A typical downdraft table requires a dust collection system capable of moving at least 400-600 cubic feet per minute (CFM) of air to function effectively.
| Consideration | Importance | Impact on Installation |
|---|---|---|
| Location | High | Affects accessibility and workflow |
| Dust Collector Capacity | High | Determines table effectiveness |
| Power Source | Medium | Influences table placement |
| Workspace Size | Medium | Affects table size selection |
When planning your installation, it's also essential to consider the types of projects you typically work on. This will influence the size of the downdraft table you choose and how you position it within your workspace. For larger projects, you may need to ensure there's ample space around the table for material handling.
Lastly, don't forget to factor in any additional features or accessories you might want to incorporate, such as adjustable height settings or built-in storage. These elements can enhance the functionality of your downdraft table but may require additional planning during the installation process.
By carefully considering these factors before you begin, you'll be well-prepared to tackle the installation process efficiently and effectively, setting yourself up for success with your new downdraft table.
How do you prepare your workspace for the downdraft table installation?
Preparing your workspace is a crucial step in ensuring a successful downdraft table installation. This process involves clearing the area, assessing the floor condition, and making any necessary adjustments to accommodate your new equipment.
Start by thoroughly cleaning and organizing the designated area for your downdraft table. Remove any obstacles or unnecessary items that might interfere with the installation process. This not only provides a clear working space but also allows you to visualize how the table will fit into your workshop layout.
Next, evaluate the condition of your floor. A level surface is essential for the proper functioning of your downdraft table. Use a spirit level to check for any unevenness and make necessary adjustments.
Ensuring a level surface for your downdraft table can improve its dust collection efficiency by up to 20%, as it prevents air gaps and ensures consistent suction across the entire table surface.
| Preparation Step | Purpose | Time Estimate |
|---|---|---|
| Clear workspace | Create installation area | 1-2 hours |
| Clean floor | Ensure proper adhesion | 30 minutes |
| Level surface | Optimize table performance | 1-2 hours |
| Mark table footprint | Guide precise placement | 15 minutes |
Once you've prepared the floor, it's time to mark out the footprint of your downdraft table. Use painter's tape or chalk to outline where the table will be placed. This will serve as a guide during the installation process and help you visualize how the table will fit into your workspace.
Consider the placement of your dust collection system and plan the route for the ductwork. If possible, minimize the distance between the downdraft table and the dust collector to maximize efficiency. You may need to install additional ductwork or modify existing setup to accommodate the new table.
Lastly, ensure that you have all the necessary tools and materials on hand before beginning the installation. This includes the downdraft table itself, any required mounting hardware, ductwork components, and your toolkit. Being well-prepared will help the installation process go smoothly and efficiently.
By taking the time to properly prepare your workspace, you're setting the stage for a successful downdraft table installation. This preparation not only makes the installation process easier but also contributes to the long-term performance and effectiveness of your dust collection system.
What are the steps for assembling the downdraft table frame?
Assembling the frame of your downdraft table is a critical step in the installation process. This structure forms the foundation of your table and must be sturdy and level to ensure optimal performance. Let's break down the assembly process into manageable steps.
Begin by carefully unpacking all the components of your downdraft table. Lay out the parts and cross-reference them with the manufacturer's inventory list to ensure you have everything you need. Familiarize yourself with the assembly instructions provided by the manufacturer, as the specific steps may vary depending on the model of your PORVOO downdraft table.
Next, start with the base of the frame. Most downdraft tables have a rectangular or square base made of sturdy metal or heavy-duty plastic. Assemble this base according to the instructions, ensuring all connections are tight and secure.
A properly assembled downdraft table frame can support up to 500 pounds of weight, allowing for the safe handling of large and heavy workpieces.
| Assembly Step | Key Points | Tools Required |
|---|---|---|
| Base assembly | Ensure level and square | Wrench, screwdriver |
| Leg attachment | Check stability | Allen key, pliers |
| Top frame assembly | Align precisely | Level, measuring tape |
| Crossbar installation | Enhance rigidity | Screwdriver, drill |
Once the base is assembled, attach the legs to the frame. Pay close attention to the orientation of each leg, as they may be designed to fit in specific positions. Use a level to ensure that the frame is perfectly horizontal as you tighten each leg into place.
After the legs are secure, it's time to assemble the top frame of the table. This is typically a rectangular frame that will support the actual work surface of the downdraft table. Align this frame carefully with the base, ensuring it's square and level.
Install any crossbars or additional support structures as specified in your table's design. These elements are crucial for maintaining the rigidity and stability of the table, especially when working with heavier materials.
Throughout the assembly process, periodically check that all connections are tight and that the frame remains level. Small adjustments made during assembly can prevent larger issues down the line.
Finally, if your downdraft table model includes adjustable features such as leveling feet or height adjustment mechanisms, install these components according to the manufacturer's instructions. These features can be invaluable for fine-tuning the table's performance in your specific workspace.
By carefully following these steps and the manufacturer's guidelines, you'll create a solid foundation for your downdraft table. A well-assembled frame ensures stability, longevity, and optimal performance of your dust collection system.
How do you install the downdraft surface and dust collection ports?
Installing the downdraft surface and dust collection ports is a crucial step in setting up your downdraft table. This process transforms the assembled frame into a functional dust collection tool, capable of effectively removing airborne particles from your work area.
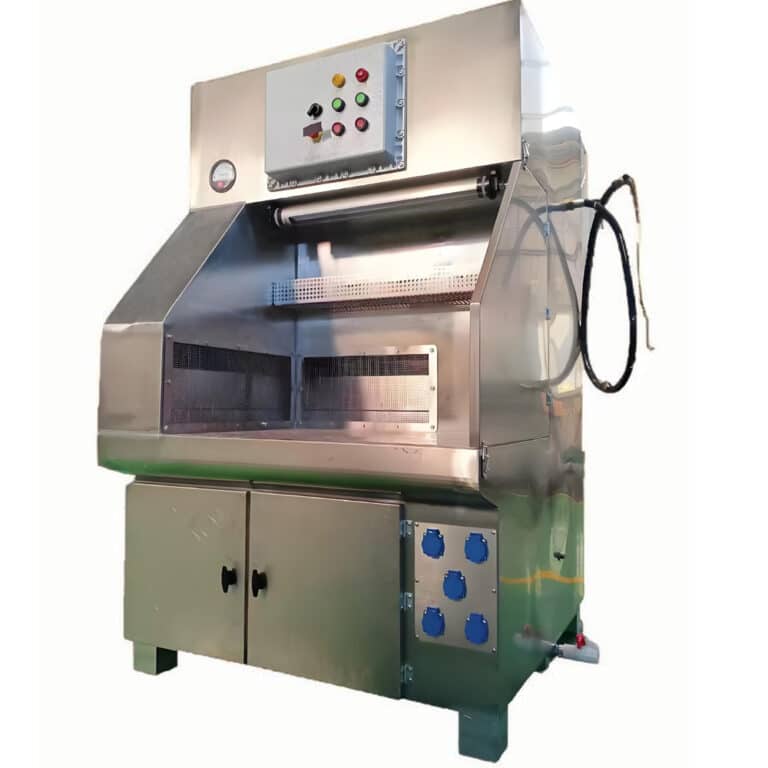
Start by carefully placing the downdraft surface onto the assembled frame. This surface is typically perforated or slotted to allow air and dust particles to be drawn downward. Ensure that the surface is correctly oriented and aligned with the frame, following any alignment markers or guides provided by the manufacturer.
Next, secure the downdraft surface to the frame using the provided fasteners. Be careful not to overtighten, as this could warp the surface and affect its performance. A snug fit is sufficient to prevent air leaks while allowing for any necessary thermal expansion.
Properly installed downdraft surfaces can increase dust collection efficiency by up to 30% compared to improperly fitted or poorly sealed surfaces.
| Installation Step | Purpose | Key Consideration |
|---|---|---|
| Surface placement | Position collection area | Proper alignment |
| Surface securing | Prevent air leaks | Avoid overtightening |
| Port installation | Connect to dust system | Seal all connections |
| Gasket application | Enhance suction | Use appropriate material |
With the surface in place, it's time to install the dust collection ports. These ports are the connection points between your downdraft table and the dust collection system. Typically located on the underside or back of the table, they should be positioned for easy access and efficient airflow.
Install the ports according to the manufacturer's instructions, ensuring a tight seal at each connection point. Use gaskets or sealant as recommended to prevent air leaks, which can significantly reduce the efficiency of your dust collection system.
If your downdraft table design includes multiple collection zones or adjustable ports, take the time to understand how these features work. They can be valuable for optimizing dust collection for different types of projects or work pieces.
After installing the ports, double-check all connections and seals. Run your hand along the edges of the downdraft surface and around the ports to feel for any air leaks. Address any issues you find before proceeding.
Finally, if your downdraft table includes additional features such as built-in filters or pre-separators, install these components as directed. These elements can enhance the performance of your dust collection system and extend the life of your main dust collector.
By carefully installing the downdraft surface and dust collection ports, you're creating an efficient pathway for dust and debris to be removed from your work area. This attention to detail during installation will pay dividends in the form of cleaner air and a more enjoyable woodworking experience.
What steps are involved in connecting the downdraft table to your dust collection system?
Connecting your downdraft table to your dust collection system is the final major step in the installation process. This connection is crucial for the effective operation of your Downdraft table installation guide , as it allows the dust and debris captured by the table to be efficiently removed from your workspace.
Begin by assessing the layout of your workshop and planning the most direct route from your downdraft table to your dust collection system. The shorter and straighter this path, the more efficient your system will be. Avoid unnecessary bends or long runs of ductwork, as these can reduce airflow and collection efficiency.
Next, measure and cut the ductwork to fit the planned route. Use sturdy, smooth-walled ducts designed for dust collection systems. Flexible hose can be used for short connections, but rigid ductwork is preferable for longer runs due to its superior airflow characteristics.
Proper ductwork installation can improve dust collection efficiency by up to 40% compared to systems with poorly designed or installed ductwork.
| Connection Step | Purpose | Best Practice |
|---|---|---|
| Route planning | Optimize airflow | Minimize bends and length |
| Ductwork cutting | Fit system to space | Use appropriate tools |
| Joint sealing | Prevent air leaks | Apply mastic or foil tape |
| Support installation | Maintain ductwork integrity | Space supports every 4-6 feet |
As you assemble the ductwork, pay close attention to the joints and connections. Use mastic sealant or foil tape to seal each joint, ensuring an airtight system. Avoid using standard duct tape, as it can deteriorate over time and lead to air leaks.
Install blast gates at strategic points in your ductwork system. These allow you to control airflow to different machines or workstations, optimizing the performance of your dust collection system when using the downdraft table.
Secure the ductwork properly using hangers or supports. This prevents sagging or movement that could lead to air leaks or reduced efficiency. Generally, supports should be placed every 4 to 6 feet along horizontal runs and at each vertical transition.
Connect the ductwork to both your downdraft table and your dust collection system, ensuring tight, sealed connections at both ends. If your dust collector has a specific inlet size, use appropriate reducers or adapters to match your ductwork.
Once all connections are made, it's time to test the system. Turn on your dust collector and check for any air leaks along the ductwork and at connection points. Listen for any unusual noises that might indicate restrictions or problems in the system.
Finally, test the downdraft table with your dust collector running. Place a piece of light material, like a small piece of paper, on the table surface to verify that there's sufficient suction across the entire work area.
By carefully connecting your downdraft table to your dust collection system, you're completing the installation process and ensuring that your new table will function effectively. This connection is the key to maintaining a clean, safe, and efficient woodworking environment.
How can you test and fine-tune your newly installed downdraft table?
After completing the installation of your downdraft table, it's essential to test and fine-tune the system to ensure optimal performance. This process helps identify any issues and allows you to make necessary adjustments for maximum efficiency.
Begin by conducting a visual inspection of the entire setup. Check all connections, ensure the table is level, and verify that all components are securely in place. This initial check can help catch any obvious issues before you start the system.
Next, power on your dust collection system and the downdraft table. Listen for any unusual noises that might indicate air leaks or obstructions in the system. Pay attention to the sound of airflow at the table surface – it should be consistent across the entire work area.
Regular testing and fine-tuning of your downdraft table can increase its dust collection efficiency by up to 15% and extend the life of your dust collection system.
| Testing Step | Purpose | Frequency |
|---|---|---|
| Visual inspection | Identify visible issues | Before each use |
| Sound check | Detect air leaks or obstructions | Weekly |
| Suction test | Verify even airflow | Monthly |
| Dust capture test | Assess real-world performance | Quarterly |
Perform a simple suction test by placing a piece of paper or light cardboard on different areas of the table surface. The material should be held firmly in place by the suction. If you notice weak spots, investigate the cause – it could be a clogged area in the downdraft surface or an air leak in the system.
To assess the table's dust capture capabilities, perform a controlled test. Use a type of wood and tool that typically generates a lot of dust, such as sanding MDF with an orbital sander. Observe how effectively the table captures the dust. If you notice a significant amount of dust escaping, you may need to adjust the table height, increase the suction power, or check for system leaks.
Check the dust collection bin or bag after your test. The amount and type of dust collected can give you insights into how well the system is performing. If you're not collecting as much dust as expected, it may indicate an issue with the system's efficiency.
Fine-tune the system based on your test results. This might involve adjusting the height of the table, repositioning blast gates to optimize airflow, or making minor modifications to your ductwork to improve efficiency.
If your downdraft table has adjustable features, such as movable collection ports or variable speed settings, experiment with these to find the optimal configuration for your typical projects.
Regularly clean the downdraft surface and check for any clogs in the collection ports or ductwork. A clean system is crucial for maintaining optimal performance over time.
Finally, consider keeping a log of your system's performance. Note any adjustments you make and their effects on dust collection efficiency. This record can be invaluable for troubleshooting issues and optimizing performance in the long run.
By thoroughly testing and fine-tuning your newly installed downdraft table, you ensure that it performs at its best. This process not only improves the immediate effectiveness of your dust collection system but also helps maintain a clean and safe workshop environment in the long term.
In conclusion, installing a downdraft table is a significant step towards creating a cleaner, safer, and more efficient woodworking environment. By following this comprehensive guide, you've learned the crucial steps involved in the installation process, from preparing your workspace to connecting the table to your dust collection system and fine-tuning its performance.
Remember that proper installation is key to maximizing the benefits of your downdraft table. A well-installed system can significantly reduce airborne dust, improve air quality, and create a more pleasant working environment. It's an investment in both your health and the quality of your woodworking projects.
As you use your newly installed downdraft table, continue to monitor its performance and make adjustments as necessary. Regular maintenance, including cleaning the table surface and checking for air leaks, will ensure that your system continues to operate at peak efficiency.
By taking the time to carefully install and optimize your downdraft table, you've taken a significant step towards enhancing your woodworking experience. Enjoy the benefits of cleaner air, reduced cleanup time, and improved finish quality in your projects. Happy woodworking!
External Resources
Workbench Downdraft Table – Dust-Free Sanding Setup – A YouTube video guide on how to build a downdraft table integrated into a workbench, including steps on constructing the box, adding downdraft panels, and connecting to a dust collection system.
Woodworking Downdraft Table Demonstration and Construction – A YouTube video demonstrating the construction of a downdraft table using an HVAC blower motor and simple wooden box with HVAC filters, showing the operation and build process.
Super Sucker Downdraft Table. Dust Free Sanding and No More Messy Cleanup – An Instructables guide providing a step-by-step DIY tutorial on building a downdraft table, including making a simple box, adding a slope and silicone seal, and attaching the dust port.
DIY Downdraft Table for Sanding | How to Build – A YouTube video guide on building a DIY downdraft table to eliminate dust during sanding, covering the materials and steps needed for the project.
Downdraft Table Plans and Instructions – An article from The Family Handyman providing detailed plans and instructions for building a downdraft table, including materials lists and step-by-step instructions.
How to Build a Downdraft Sanding Table – An article from Fine Woodworking that offers a comprehensive guide on building a downdraft sanding table, focusing on design, materials, and construction techniques.
