Automatic dosing systems have revolutionized water treatment processes across various industries, from aquaculture to wastewater management. These sophisticated systems ensure precise and consistent chemical dosing, leading to improved efficiency, reduced human error, and optimal water quality. In this comprehensive guide, we'll walk you through the intricacies of automatic dosing system installation, providing expert insights and practical tips to help you successfully implement this technology in your facility.
As we delve into the world of automatic dosing systems, we'll cover everything from pre-installation considerations to post-installation maintenance. You'll learn about the essential components of these systems, the importance of proper calibration, and how to troubleshoot common issues. Whether you're a seasoned professional or new to water treatment technologies, this guide will equip you with the knowledge and confidence to tackle automatic dosing system installation with ease.
Before we dive into the nitty-gritty of installation, it's crucial to understand the significance of automatic dosing systems in modern water treatment processes. These systems not only streamline operations but also contribute to more sustainable and cost-effective water management practices. By the end of this guide, you'll have a comprehensive understanding of how to implement an automatic dosing system that meets your specific needs and ensures optimal performance.
Automatic dosing systems can reduce chemical consumption by up to 30% compared to manual dosing methods, leading to significant cost savings and environmental benefits.
What are the key components of an automatic dosing system?
An automatic dosing system comprises several essential components that work together to deliver precise chemical doses to your water treatment process. Understanding these components is crucial for successful installation and operation.
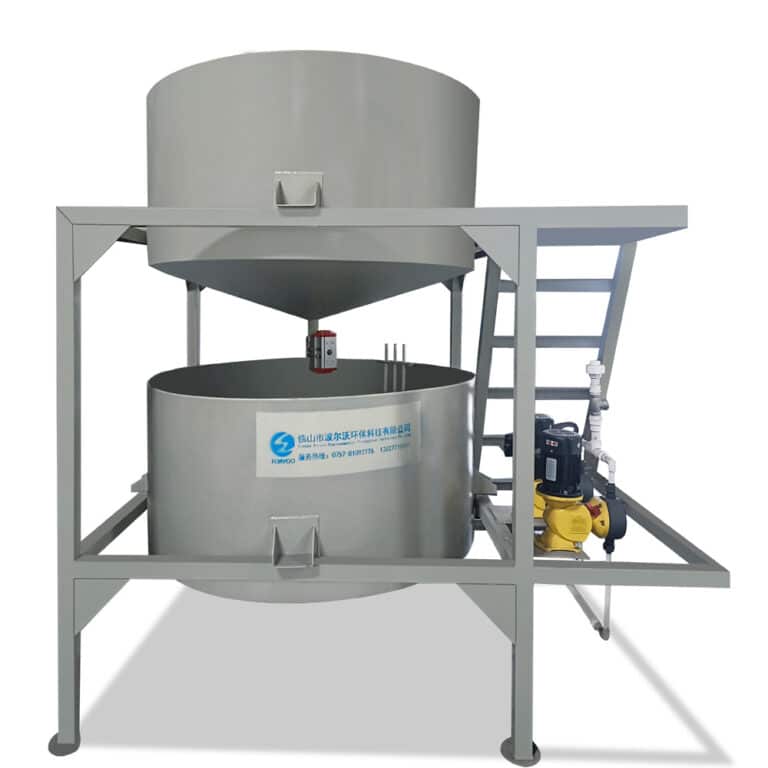
The heart of any automatic dosing system is the dosing pump. This precision instrument is responsible for accurately measuring and dispensing the required amount of chemicals into the water. Alongside the pump, you'll find storage tanks for chemical solutions, injection points, and a control system that orchestrates the entire operation.
Other critical components include flow meters, level sensors, and backpressure valves. These elements ensure the system operates efficiently and safely, preventing issues such as overdosing or running dry.
A well-designed automatic dosing system can maintain chemical concentrations within 1% of the target value, ensuring consistent water quality and treatment efficacy.
| Component | Function | Importance |
|---|---|---|
| Dosing Pump | Measures and dispenses chemicals | High |
| Storage Tanks | Hold chemical solutions | Medium |
| Control System | Orchestrates dosing operations | High |
| Flow Meters | Monitor liquid flow rates | Medium |
| Level Sensors | Detect chemical levels in tanks | Medium |
| Backpressure Valves | Maintain system pressure | High |
When installing an automatic dosing system, it's essential to consider the specific requirements of your facility. Factors such as the type of chemicals being used, the desired flow rate, and the overall water treatment goals will influence the selection and configuration of these components. By carefully choosing and integrating each element, you can create a robust and efficient dosing system that meets your unique needs.
How do you prepare for automatic dosing system installation?
Proper preparation is key to a successful automatic dosing system installation. This phase involves several critical steps that set the foundation for a smooth and efficient installation process.
Begin by conducting a thorough site assessment. This includes evaluating the available space, identifying potential mounting locations for system components, and assessing the existing plumbing and electrical infrastructure. It's also crucial to consider safety requirements, such as containment measures for chemical spills and proper ventilation.
Next, gather all necessary materials and tools. This typically includes the dosing pump, chemical storage tanks, piping, valves, and electrical components. Ensure you have the appropriate personal protective equipment (PPE) on hand, such as gloves, safety goggles, and chemical-resistant clothing.
Proper preparation can reduce installation time by up to 40% and minimize the risk of costly errors or safety incidents during the process.
| Preparation Step | Description | Priority |
|---|---|---|
| Site Assessment | Evaluate space and infrastructure | High |
| Material Gathering | Collect all necessary components | High |
| Safety Planning | Identify and address safety concerns | High |
| Team Briefing | Inform all involved personnel | Medium |
| Documentation Review | Study manuals and schematics | Medium |
Before beginning the installation, it's wise to review all relevant documentation, including manufacturer's instructions, system schematics, and safety data sheets for the chemicals you'll be using. This knowledge will prove invaluable during the installation process and help you anticipate potential challenges.
By taking the time to properly prepare for your automatic dosing system installation, you'll set yourself up for success and ensure a more efficient and effective installation process.
What are the step-by-step instructions for installing an automatic dosing system?
Installing an automatic dosing system requires careful attention to detail and a systematic approach. By following these step-by-step instructions, you can ensure a successful installation that meets all safety and performance requirements.
Mount the dosing pump: Begin by securely mounting the dosing pump in a location that is easily accessible for maintenance and close to the injection point. Ensure the pump is level and protected from environmental factors.
Install chemical storage tanks: Position the chemical storage tanks in a safe, contained area. Make sure they are properly labeled and equipped with level sensors to prevent running dry.
Connect plumbing: Install the necessary piping to connect the storage tanks to the dosing pump and the pump to the injection point. Use chemical-resistant materials and ensure all connections are leak-free.
Set up the control system: Install the control panel in a dry, accessible location. Connect it to the dosing pump, level sensors, and any other monitoring devices.
Install safety features: Implement safety measures such as backpressure valves, anti-siphon devices, and containment systems to prevent chemical spills and system failures.
Proper installation of safety features can reduce the risk of chemical spills and system failures by up to 90%, protecting both personnel and the environment.
| Installation Step | Key Considerations | Estimated Time |
|---|---|---|
| Pump Mounting | Accessibility, protection | 1-2 hours |
| Tank Installation | Safety, containment | 2-3 hours |
| Plumbing | Chemical resistance, leak prevention | 3-4 hours |
| Control System Setup | Wiring, programming | 2-3 hours |
| Safety Feature Implementation | Regulatory compliance | 1-2 hours |
After completing the physical installation, it's crucial to thoroughly test the system. This includes checking for leaks, calibrating the dosing pump, and verifying that all safety features are functioning correctly. Only after successful testing should you begin introducing chemicals into the system.
Remember, while these steps provide a general guide, it's essential to consult the specific instructions provided by the manufacturer of your PORVOO automatic dosing system. Their expertise and product-specific guidance will ensure you achieve the best possible installation results.
How do you calibrate an automatic dosing system?
Calibration is a critical step in the installation process of an automatic dosing system. Proper calibration ensures that the system delivers the precise amount of chemicals required for optimal water treatment, maximizing efficiency and minimizing waste.
To begin the calibration process, you'll need to determine the specific dosing requirements for your application. This involves calculating the desired chemical concentration and flow rate based on your water treatment goals and system parameters.
Next, you'll need to adjust the dosing pump settings to match these requirements. This typically involves setting the stroke length and frequency of the pump to achieve the desired flow rate. Many modern dosing systems feature digital controls that simplify this process.
Accurate calibration can improve dosing precision by up to 99%, leading to more effective treatment and reduced chemical consumption.
| Calibration Step | Purpose | Frequency |
|---|---|---|
| Flow Rate Verification | Ensure correct chemical delivery | Monthly |
| Concentration Testing | Verify chemical solution strength | Weekly |
| Pump Stroke Adjustment | Fine-tune dosing precision | As needed |
| Sensor Calibration | Maintain accurate monitoring | Quarterly |
| System Performance Check | Overall efficiency assessment | Bi-annually |
After initial calibration, it's important to regularly verify and adjust the system's performance. This involves periodic testing of the treated water to ensure the desired chemical concentrations are being maintained. If discrepancies are found, recalibration may be necessary.
Remember that environmental factors, changes in water quality, or wear on system components can affect calibration over time. Regular maintenance and recalibration are essential for maintaining the optimal performance of your automatic dosing system.
What safety precautions should be taken during installation?
Safety should be the top priority when installing an automatic dosing system. These systems often involve handling hazardous chemicals and working with electrical components, making it crucial to implement robust safety measures throughout the installation process.
First and foremost, ensure that all personnel involved in the installation are properly trained and equipped with appropriate personal protective equipment (PPE). This typically includes chemical-resistant gloves, safety goggles, and protective clothing.
Proper ventilation is essential when working with chemical dosing systems. Ensure that the installation area is well-ventilated to prevent the buildup of potentially harmful fumes. In some cases, additional ventilation equipment may be necessary.
Implementing comprehensive safety measures can reduce workplace accidents related to chemical handling by up to 80%, protecting both personnel and the environment.
| Safety Measure | Purpose | Implementation |
|---|---|---|
| PPE Use | Personal protection | Mandatory for all personnel |
| Ventilation | Fume control | Ensure adequate air flow |
| Chemical Containment | Spill prevention | Install containment barriers |
| Emergency Procedures | Rapid response | Develop and communicate plans |
| Electrical Safety | Prevent shocks | Use proper insulation and grounding |
It's crucial to install proper containment measures to prevent and manage potential chemical spills. This may include containment barriers around storage tanks and secondary containment systems beneath pumps and piping.
Electrical safety is another critical consideration. Ensure all electrical connections are properly insulated and grounded. If working in wet areas, use equipment rated for such environments to prevent electrical hazards.
Lastly, develop and communicate clear emergency procedures. This should include steps for handling chemical spills, addressing equipment malfunctions, and evacuating the area if necessary. By prioritizing safety throughout the installation process, you can protect your personnel and ensure a successful implementation of your automatic dosing system.
How do you troubleshoot common issues with automatic dosing systems?
Even with careful installation and calibration, automatic dosing systems can occasionally encounter issues. Understanding how to troubleshoot these problems is essential for maintaining system efficiency and preventing prolonged downtime.
One common issue is inconsistent dosing. This can be caused by air bubbles in the system, worn pump components, or incorrect calibration. To address this, check for leaks in the suction line, inspect pump valves for wear, and recalibrate the system if necessary.
Another frequent problem is chemical crystallization, which can clog pipes and valves. Regular flushing of the system with clean water can help prevent this issue. If crystallization occurs, you may need to disassemble and clean affected components.
Regular maintenance and prompt troubleshooting can reduce system downtime by up to 70%, ensuring consistent water treatment and operational efficiency.
| Common Issue | Possible Causes | Troubleshooting Steps |
|---|---|---|
| Inconsistent Dosing | Air in system, worn parts | Check for leaks, inspect valves |
| Chemical Crystallization | Inadequate flushing | Regular system cleaning |
| Pump Failure | Electrical issues, wear | Check power supply, replace parts |
| Sensor Malfunction | Calibration drift, damage | Recalibrate, inspect for damage |
| Control System Errors | Software glitches, power issues | Reboot system, check connections |
Pump failure is a serious issue that can halt the entire dosing process. This can be caused by electrical problems, worn mechanical parts, or chemical damage. Start by checking the power supply and connections. If the issue persists, you may need to replace worn pump components or the entire pump unit.
Sensor malfunctions can lead to inaccurate dosing or system shutdowns. Regularly calibrate sensors and inspect them for signs of damage or corrosion. If a sensor consistently provides incorrect readings, it may need to be replaced.
Control system errors can disrupt the entire dosing process. These may be caused by software glitches or power supply issues. Try rebooting the system and checking all electrical connections. If problems persist, consult the manufacturer's troubleshooting guide or contact technical support.
Remember, while these troubleshooting steps can address many common issues, some problems may require professional assistance. Don't hesitate to contact the experts at PORVOO for advanced troubleshooting and maintenance support for your automatic dosing system.
What ongoing maintenance is required for an automatic dosing system?
Maintaining an automatic dosing system is crucial for ensuring its longevity, efficiency, and accuracy. A well-maintained system not only performs better but also reduces the risk of unexpected breakdowns and extends the lifespan of its components.
Regular inspections form the foundation of a good maintenance routine. This involves visually checking all components for signs of wear, corrosion, or damage. Pay particular attention to pump seals, valves, and tubing, as these parts are often subject to the most stress.
Cleaning is another essential aspect of maintenance. Regularly flush the system with clean water to prevent chemical build-up and crystallization. Some components, such as filters and injection points, may require more frequent cleaning depending on the chemicals used and the operating conditions.
Implementing a comprehensive maintenance schedule can extend the lifespan of an automatic dosing system by up to 50%, reducing long-term costs and improving overall system reliability.
| Maintenance Task | Frequency | Importance |
|---|---|---|
| Visual Inspection | Weekly | High |
| System Flushing | Monthly | High |
| Calibration Check | Quarterly | Medium |
| Component Replacement | As needed | High |
| Software Updates | As released | Medium |
Calibration checks should be performed regularly to ensure the system continues to dose accurately. This typically involves verifying flow rates and chemical concentrations in the treated water. The frequency of these checks may vary depending on your specific application and regulatory requirements.
Component replacement is an inevitable part of maintenance. Keep a stock of commonly worn parts, such as pump diaphragms and valves, to minimize downtime when replacements are needed. Follow the manufacturer's recommendations for part replacement intervals.
For systems with digital controls, staying up-to-date with software updates is important. These updates often include improvements in functionality and security, ensuring your system operates at peak performance.
Lastly, maintain detailed records of all maintenance activities, including inspections, cleanings, calibrations, and part replacements. This documentation can help identify patterns, predict future maintenance needs, and demonstrate compliance with regulatory requirements.
By implementing a robust maintenance routine, you can ensure your automatic dosing system continues to operate efficiently and accurately, providing reliable water treatment for years to come.
In conclusion, the installation and maintenance of an automatic dosing system is a complex but rewarding process that can significantly enhance your water treatment operations. From the initial preparation and installation steps to ongoing calibration, troubleshooting, and maintenance, each phase plays a crucial role in ensuring the system's effectiveness and longevity.
By following the guidelines outlined in this article, you can confidently approach the installation of your automatic dosing system, knowing you have the knowledge to handle each step of the process. Remember to prioritize safety throughout the installation and operation of your system, protecting both your personnel and the environment.
Regular maintenance and prompt troubleshooting are key to maximizing the benefits of your automatic dosing system. By staying vigilant and addressing issues promptly, you can ensure consistent, accurate chemical dosing that meets your water treatment goals while minimizing waste and operational costs.
As water treatment technologies continue to evolve, automatic dosing systems will play an increasingly important role in ensuring efficient, sustainable water management across various industries. By mastering the installation and maintenance of these systems, you're not just improving your current operations – you're preparing for the future of water treatment.
Whether you're installing a new system or looking to optimize an existing one, the principles outlined in this guide will serve you well. And remember, for expert support and cutting-edge automatic dosing solutions, PORVOO is always ready to assist you in achieving your water treatment goals.
External Resources
- Instruction Manual: Aquascape Automatic Dosing System – This manual provides a comprehensive guide for the installation, maintenance, and troubleshooting of the Aquascape Automatic Dosing System for ponds and fountains.
- How to install Pure Aqua's chemical dosing system – YouTube – This video guide walks through the process of installing a chemical dosing system, including safety precautions, step-by-step installation, electrical connections, initial setup, and maintenance tips.
- Installation and Operation Procedures for Chemical Dosing Equipment – This guide details the installation and operation steps for chemical dosing equipment, including connecting pipelines, checking for fluid leakage, and troubleshooting common issues.
- Guide for a Successful Dosing Pump Installation – This article provides tips for a successful dosing pump installation, including ensuring compatibility of chemicals with pump parts, installing back-pressure valves, and using short suction hoses to avoid airlocks and corrosion.
- Automatic Dosing Systems – Aquascape Inc. – This resource provides detailed installation options, discharge options, and priming instructions specific to Aquascape's Automatic Dosing Systems for ponds and fountains.
- Chemical Dosing System Installation and Maintenance – Snowate – This resource offers a comprehensive set of instructions for installing and maintaining chemical dosing systems, including analysis of advantages, installation steps, and troubleshooting solutions for common issues.
