Introduction to Wet Station Grinding Tables
The day I watched a master metalworker shape a complex piece without creating a hazardous dust cloud was when I truly appreciated the value of a proper wet station grinding setup. Far from being just another workshop fixture, these specialized tables represent the intersection of craftsmanship, safety, and environmental responsibility in metal fabrication.
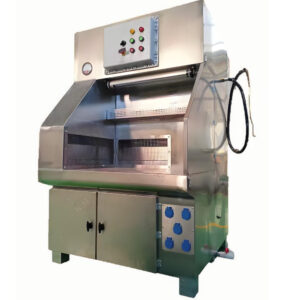
Wet station grinding tables serve as specialized workstations designed to control dust and debris during metalworking operations through the use of water. Unlike their dry counterparts, these stations capture metal particles in a water bath, significantly reducing airborne contaminants while simultaneously cooling the workpiece. This dual functionality makes them invaluable in professional metalworking environments where precision and safety cannot be compromised.
The metalworking industry has increasingly embraced these systems, and for good reason. According to a 2022 occupational health study, properly configured wet grinding stations can reduce airborne particulate matter by up to 87% compared to conventional dry grinding. This dramatic improvement directly translates to healthier working conditions and reduced respiratory risks for operators.
Setting up a wet station grinding table correctly involves more than simply assembling parts and adding water. It requires careful consideration of multiple interconnected systems – from water management to filtration, from work surface configuration to ventilation integration. Each element must function in harmony with the others to create a safe, efficient workspace that enhances rather than hinders productivity.
As manufacturers like PORVOO continue to develop more sophisticated wet grinding solutions, understanding the fundamentals of proper setup becomes even more crucial. A well-configured station not only protects health and improves work quality but also extends equipment lifespan through proper operation.
Let’s explore the step-by-step process of creating an optimized wet grinding environment that balances safety, efficiency, and performance.
Understanding the Components of a Wet Station Grinding Table
Before diving into the setup procedure, it’s essential to understand what makes up a wet station grinding table and how each component contributes to its overall functionality. This knowledge forms the foundation for a successful installation.
At its core, a wet grinding table consists of several integrated systems working in concert:
Water Basin and Circulation System
The water basin forms the heart of any wet station grinding table setup. Typically constructed from corrosion-resistant materials like stainless steel, this reservoir holds the water that captures grinding particles and cools workpieces. Connected to this basin is a circulation system – consisting of pumps, hoses, and sometimes spray nozzles – that maintains water flow across the work surface. The water flow rate is crucial; too little fails to capture particles effectively, while excessive flow can interfere with precision work.
Filtration System
Perhaps the most technically sophisticated component, the filtration system prevents the recirculation of captured particles. Modern systems often employ a multi-stage approach:
- Primary filtration: Captures larger particles through screens or settlement
- Secondary filtration: Removes finer particles through mechanical or chemical means
- Final filtration: Ensures water clarity through polishing filters
Work Surface
The actual grinding surface features perforations or grates that allow water to flow while supporting workpieces securely. Material choice here is critical – it must resist corrosion while maintaining dimensional stability despite constant water exposure.
Downdraft Ventilation System
Working in conjunction with the water system, the downdraft system creates negative pressure that pulls remaining airborne particles downward. This system connects to external ventilation or filtration units via ducting.
Control Systems
Modern wet grinding tables feature integrated controls for water flow, filtration cycling, and ventilation intensity. These may range from simple manual valves to sophisticated electronic interfaces with programmable settings.
Drainage and Waste Management
Often overlooked but essential, proper drainage systems ensure efficient water cycling and waste removal. This typically includes overflow protection, sediment collection points, and connections to workshop drainage.
When examining industrial dry-wet station downdraft grinding tables, you’ll notice variations in how these components are implemented, but the fundamental principles remain consistent. Understanding these components and their relationships is crucial before beginning the physical setup process.
The integration of these systems creates a symbiotic environment where water captures particles, filtration removes contaminants, ventilation contains any escaping dust, and drainage manages waste – all while providing a stable work platform. This complexity explains why proper setup is so critical to achieving optimal performance.
Step 1: Selecting the Optimal Location
The journey toward an effective wet station grinding table setup begins well before assembly – with thoughtful placement within your workspace. This initial decision influences everything from installation ease to long-term operational efficiency.
When I helped redesign our fabrication shop last year, we initially positioned our grinding station against an interior wall to save floor space. What seemed convenient quickly proved problematic – limited ventilation access, difficult water connections, and awkward workflow integration. The lesson was clear: location matters tremendously.
Space Requirements and Clearances
Start by measuring your specific model’s dimensions, adding a minimum of 36 inches of clearance on all sides for operator movement and maintenance access. For the PORVOO industrial models, this typically translates to a dedicated footprint of about 8×8 feet minimum, though larger is preferable. Height clearance must accommodate not just the table but any overhead extraction components or lighting fixtures.
Remember that space needs extend beyond the physical dimensions of the equipment. Consider:
- Material staging areas for incoming and completed pieces
- Tool storage for grinding attachments and accessories
- Maintenance access zones, particularly for filtration components
- Operator positioning zones that account for comfortable working postures
Infrastructure Considerations
A successful wet grinding station requires three crucial connections:
Water Supply: Proximity to a dedicated water line with appropriate pressure (typically 30-60 PSI) is essential. Installing a dedicated shutoff valve within arm’s reach of the station is strongly recommended.
Drainage Access: The table must connect to adequate drainage that can handle both regular water cycling and occasional complete system purges. Floor drains are ideal, but alternative solutions may include:
- Elevated platforms with gravity drainage
- Submersible pump systems for remote drainage
- Dedicated waste collection tanks (though these require regular emptying)
- Electrical Requirements: Beyond standard outlets for the main unit, consider:
- Dedicated circuits for high-amperage models
- GFCI protection for all connections given the water presence
- Convenient access for associated equipment like air compressors
- Task lighting placement and power needs
Environmental Factors
The surrounding environment significantly impacts performance. Ideal conditions include:
- Temperature-controlled spaces (40-90°F) to prevent water system issues
- Adequate ambient ventilation to supplement the table’s downdraft system
- Protection from direct sunlight which can accelerate algae growth in water systems
- Isolation from excessive ambient dust which can overload filtration systems
Workflow Integration
Perhaps most critical yet often overlooked is how the station integrates into your overall workflow. Position the wet grinding station to minimize material handling distances and avoid crossflow with other operations. Environmental health specialist Mark Terrell notes that “proper positioning of wet grinding stations within the workflow can reduce operator fatigue by up to 30% while simultaneously improving production efficiency.”
By taking the time to carefully evaluate location options before installation begins, you’ll avoid costly repositioning later and create the foundation for an efficient setup process.
Step 2: Assembling the Base Structure
With your location selected, the next critical phase in wet station grinding table setup involves constructing a solid foundation that will support all subsequent components. This step might seem straightforward, but attention to detail here prevents numerous problems later.
I’ve learned through experience that rushing base assembly inevitably leads to stability issues that become progressively worse – and more difficult to correct – as additional components are added. Taking extra time now saves significant headaches later.
Frame Assembly Guidelines
Modern wet grinding tables typically arrive partially assembled, but require final construction of the supporting framework. When working with industrial downdraft grinding tables, follow these key principles:
Sequential Assembly: Follow manufacturer instructions precisely regarding assembly order. Components are designed to build upon one another in a specific sequence that ensures proper alignment.
Fastener Management: Use the exact hardware provided, applying manufacturer-specified torque values. Over-tightening can damage threaded inserts or create stress points, while under-tightening leads to instability.
Alignment Verification: Measure diagonals between corners at multiple stages during assembly to confirm square construction. Even 1/4 inch of misalignment can compromise water flow patterns.
Leveling Techniques
Achieving perfect level is non-negotiable for wet grinding tables. Water follows gravity mercilessly, and even slight imbalances create uneven flow across work surfaces.
A professional approach to leveling involves:
Establishing a Reference: Use a high-quality digital level (accurate to 0.1 degrees) to establish baseline measurements on your floor.
Progressive Adjustment: Start with rough leveling of the entire frame, then proceed to fine-tuning:
- Begin with corner-to-corner adjustments
- Progress to side-to-side balancing
- Finish with precise adjustments using machinist levels
Shim Selection: Use appropriate materials for shimming:
Shim Material Advantages Best Applications Stainless steel Corrosion resistant, precise thickness Fine adjustments, wet environments Neoprene Vibration damping, prevents slippage Between table and floor, especially on concrete Composite Combines stability with corrosion resistance General purpose applications Load Testing: After initial leveling, place weights approximating actual working conditions on various points of the frame. This reveals any areas that may deflect under load.
Stability Verification
Before proceeding to water system installation, verify base stability through:
Racking Tests: Apply moderate lateral force to the frame at different points to detect any movement or flex.
Vibration Assessment: Use a small motor (like a handheld grinder) placed at various locations to simulate working conditions and identify resonance issues.
Connection Inspection: Double-check all fasteners, welds, and junction points for proper engagement and security.
Master fabricator Elena Kobayashi emphasizes that “the stability of your grinding station’s base directly determines the precision of your finished work. A properly constructed base eliminates vibration that would otherwise transfer directly to your grinding operations.”
Once you’ve confirmed your base structure is perfectly level, square, and stable, you’ve created the solid foundation necessary for the more complex systems to follow. This methodical approach may add an hour or two to your setup time, but will save countless hours of troubleshooting and quality issues over the life of the equipment.
Step 3: Installing the Water System
With a solid foundation in place, we now address perhaps the most distinctive element of wet station grinding table setup: the water system. This network of components transforms a standard workstation into an effective dust control solution while providing cooling benefits for both tools and materials.
During my years managing metalworking operations, I’ve found water system installation to be the most technically demanding aspect of the setup process – and the one most prone to issues when rushed. Taking a methodical approach here pays dividends in system longevity and performance.
Water Supply Connection
Begin with establishing the primary water source connection:
- Inlet Configuration: Install the manufacturer-provided inlet valve assembly, ensuring:
- PTFE tape or appropriate thread sealant on all threaded connections
- Proper orientation of check valves to prevent backflow
- Accessible positioning of manual shutoff valves
Pressure Regulation: Most wet grinding tables with advanced dust collection require water pressure between 30-60 PSI. Install a dedicated pressure regulator if your supply exceeds this range. This prevents damage to spray nozzles and ensures consistent water distribution.
Filtration Protection: Add an inline sediment filter before the table’s inlet to prevent contaminants from entering the system. This simple addition significantly extends the life of internal components.
Basin Setup and Sealing
The water basin serves as both reservoir and particle collection system:
Gasket Installation: Apply continuous, even pressure when seating basin gaskets. Uneven compression leads to leaks that may not appear immediately but develop over time.
Basin Connection: When securing the basin to the frame:
- Follow torque specifications in sequence (similar to tightening a car wheel)
- Verify gasket compression is uniform around the entire perimeter
- Apply food-grade silicone sealant at junction points if indicated by manufacturer
- Overflow Protection: Configure overflow systems according to specifications, ensuring clear paths to drainage connections.
Pump and Circulation System
The circulation system distributes water across working surfaces:
- Pump Installation: Mount the recirculation pump following these guidelines:
- Position at manufacturer-specified height relative to water level
- Ensure firm mounting that minimizes vibration transfer
- Connect electrical supply through GFCI protection
- Distribution Network: When connecting distribution piping:
- Remove all burrs from cut pipe ends
- Use appropriate adhesives for plastic components
- Maintain minimum bend radiuses to prevent flow restriction
A critical table of water flow specifications often serves as reference during setup:
| Zone | Optimal Flow Rate | Nozzle Type | Purpose |
|---|---|---|---|
| Main work surface | 2.5-3.5 GPM | Wide-pattern spray | Primary dust capture |
| Perimeter | 1.0-1.5 GPM | Directional jet | Boundary containment |
| Tool ports (if equipped) | 0.5-1.0 GPM | Focused stream | Direct tool cooling |
| Basin circulation | 5.0+ GPM | Submerged agitation | Prevents settlement |
Leak Testing Protocol
Before proceeding further, conduct comprehensive leak testing:
Low-Pressure Test: Fill the system to minimum operating level and circulate water at low pressure for 30 minutes, inspecting all connections.
Full-Pressure Test: Increase to maximum operating pressure for an additional 30 minutes.
Dynamic Testing: With system at operating pressure, introduce vibration simulating working conditions to reveal potential weak points.
Hydrodynamics consultant Dr. Sarah Wei notes that “approximately 80% of long-term wet grinding table issues stem from improper initial water system installation. Taking time for proper sealing and thorough leak testing eliminates the majority of future maintenance headaches.”
With water systems correctly installed and verified leak-free, your wet grinding table is beginning to take shape. The meticulous approach to this step ensures reliable operation and protects surrounding infrastructure from water damage.
Step 4: Configuring the Filtration System
The filtration system represents the environmental intelligence of your wet station grinding table setup. Without proper filtration, grinding residue quickly degrades water quality, compromises system performance, and creates disposal challenges. Configuring this system correctly establishes the foundation for sustainable operation.
My experience with high-volume metalworking operations has taught me that filtration is often the difference between a wet grinding system that requires constant maintenance and one that operates reliably for months between major service intervals.
Understanding Filtration Stages
Modern wet grinding stations typically employ multi-stage filtration, each addressing specific contaminant types:
- Primary Filtration (Mechanical Separation)
- Typically consists of baffles, settlement chambers, or coarse screens
- Captures particles larger than 100 microns
- Requires accessibility for frequent cleaning
- Secondary Filtration (Fine Particle Removal)
- Utilizes filter media, centrifugal separation, or cyclonic action
- Targets particles between 5-100 microns
- Needs careful installation to prevent bypass
- Tertiary Filtration (Water Polishing)
- May include activated carbon, ion exchange, or specialized media
- Addresses dissolved contaminants and ensures water clarity
- Requires precise flow rate control for effectiveness
Installation Sequence
Follow this methodical approach to filtration system installation:
Housing Alignment: Position filter housings following scribe marks or alignment guides. Verify correct orientation relative to water flow direction (often indicated by arrows on components).
Seal Verification: Before installing filter elements, inspect all O-rings and gaskets for:
- Proper seating in grooves without twisting or pinching
- Absence of manufacturing defects or shipping damage
- Correct sizing and material specification
- Media Installation: When inserting filtration media or cartridges:
- Handle with clean gloves to prevent contamination
- Verify proper seating against sealing surfaces
- Follow precise orientation guidelines (particularly important for pleated elements)
- Flow Direction Confirmation: Double-check that all components are oriented to match system flow indicators. Reversed filters not only perform poorly but may structurally fail under pressure.
Optimization for Specific Materials
Different grinding materials require tailored filtration approaches. When setting up your industrial grinding table with integrated filtration, consider customizing the system based on your primary workpiece materials:
| Material | Filtration Challenge | Recommended Adaptation |
|---|---|---|
| Ferrous metals | Magnetic particles bypass some filters | Add magnetic pre-filter elements |
| Aluminum | Creates fine, floating particles | Enhance flocculation/settlement stage |
| Stainless steel | Chromium content in wastewater | Include specialized media for heavy metal capture |
| Mixed materials | Varying particle densities | Implement multi-density filter arrangement |
| Composites | Resin binding and floating fibers | Add surface skimming filtration component |
Monitoring and Adjustment Systems
Install monitoring equipment that provides early indication of filtration effectiveness:
Pressure Differential Gauges: Mount these across filter elements to indicate loading levels. Mark normal operating ranges clearly for operator reference.
Flow Indicators: Install visual flow indicators at strategic points to confirm proper circulation through all filtration pathways.
Sampling Ports: Add water sampling access points before and after key filtration stages to enable water quality testing.
Environmental engineer Marco Rodriguez emphasizes that “The gradual nature of filtration degradation makes it easy to overlook until system performance significantly deteriorates. Implementing proper monitoring from the initial setup provides the feedback necessary for proactive maintenance.”
With filtration properly configured, your wet grinding table is now equipped to maintain water quality while effectively capturing and containing grinding residue. This system will significantly reduce maintenance frequency and extend the operational life of all water-contacting components.
Step 5: Setting Up the Work Surface
The work surface of your wet station grinding table is where theory meets practice – where design intent translates to actual metalworking performance. Setting up this critical interface correctly ensures both dust control effectiveness and working precision.
I’ve observed countless workshops where beautifully engineered wet grinding systems were compromised by improper work surface setup. The resulting inefficiencies affected both safety and productivity, underscoring the importance of this step.
Surface Alignment and Integration
Begin by carefully positioning the work surface components:
- Height Calibration: Adjust the work surface to ergonomic height, typically 34-36 inches for standing operations. This may involve:
- Shimming mounting brackets
- Adjusting threaded supports
- Setting hydraulic or pneumatic height mechanisms
- Levelness Verification: Using precision levels, verify the work surface maintains true horizontal position across its entire area. Pay particular attention to:
- Corner-to-corner diagonals
- Edge-to-edge measurements
- Center-to-perimeter relationships
- Grid/Grate Installation: When installing perforated work surfaces or grates:
- Verify orientation matches water flow patterns
- Confirm edge sealing prevents bypass leakage
- Check for flush transitions between sections
Water Distribution Configuration
Proper water flow across the work surface is essential for dust capture:
- Nozzle Positioning: Adjust spray nozzles to create optimal coverage:
- Maintain consistent overlap between spray patterns
- Position edges sprays to create containment boundaries
- Angle nozzles to direct particles toward collection points
- Flow Balancing: Calibrate water distribution to provide even coverage:
- Adjust flow restrictors to compensate for pressure differences
- Set higher flow rates at primary working areas
- Create appropriate flow for different work surface zones
- Spray Pattern Testing: Verify effective water distribution through:
- Visual inspection with system running
- Smoke testing to confirm capture patterns
- Test grinding to validate real-world performance
Work Holding Integration
Incorporating secure workholding without compromising water flow requires careful planning:
- Fixed Mounting Points: If installing permanent fixtures:
- Position to avoid blocking critical water jets
- Seal penetrations through the work surface
- Ensure drainage paths remain unobstructed
- Removable Fixtures: For interchangeable workholding:
- Create registration systems that maintain alignment
- Design for quick drainage when removed
- Ensure compatibility with water presence
- Specialized Adaptations: Consider custom modifications for specific work types:
Work Type Surface Adaptation Benefits Small parts Raised mesh sections Prevents small items from washing away Precision grinding Solid inserts in key areas Provides stable reference surfaces Heavy components Reinforced support zones Maintains surface flatness under load Hand-held work Ergonomic contours Improves operator comfort and control Surface Protection and Maintenance Preparation Prepare the work surface for long-term performance:
- Protective Treatments: Apply appropriate corrosion protection:
- Verify compatibility with work materials
- Ensure application won’t interfere with water flow
- Select treatments that withstand frequent water exposure
Wear Indicators: Mark or install indicators showing when surface components need replacement.
Accessibility Planning: Ensure all fasteners and adjustment points remain accessible for future maintenance.
Metalworking instructor Carlos Vega notes that “The work surface configuration directly influences particle capture efficiency. In our teaching workshop, we’ve found that proper surface setup can improve dust capture by up to 40% compared to poorly configured systems, even when all other components are identical.”
With your work surface properly established, you’ve created the interface where grinding operations will occur safely and effectively. This critical component balances the competing needs for structural support, water flow, and work accessibility while maintaining the dust control capabilities that define a properly configured wet grinding table.
Step 6: Connecting and Testing the Dust Collection System
While water captures much of the grinding debris, the integrated dust collection system handles the finer particles that might otherwise escape. This downdraft ventilation component represents the final defense against workplace contamination and requires meticulous setup to function correctly.
Having retrofitted several shops with improved dust collection, I’ve seen firsthand how proper ventilation integration transforms workplace air quality. The difference between mediocre and excellent dust collection often comes down to connection details and thorough testing.
Ducting Installation
Begin with proper ducting installation following these guidelines:
- Sizing Considerations: Verify all ducting meets or exceeds manufacturer specifications:
- Maintain minimum diameter throughout the system
- Use gradual reductions rather than abrupt transitions
- Follow recommended materials (typically galvanized steel or specialized dust-rated flexible hose)
- Routing Optimization: Plan ducting paths carefully:
- Minimize bend count (each 90° bend reduces efficiency by ~15%)
- Use long-radius turns instead of sharp elbows
- Maintain adequate support to prevent sagging or vibration
- Sealing Protocol: Ensure airtight connections throughout:
- Apply appropriate duct sealant at all joints
- Install gaskets at flanged connections
- Use proper band clamps for flexible sections
Blower and Motor Connections
The extraction system’s heart is its blower assembly:
- Motor Mounting: Secure the blower/motor assembly following these practices:
- Install on vibration isolation mounts
- Verify correct belt tension (if belt-driven)
- Ensure proper electrical connections with appropriate safety overloads
- Airflow Direction: Confirm proper orientation relative to system design:
- Verify rotation direction matches indicated arrow
- Check that inlet and outlet are correctly positioned
- Ensure unrestricted airflow around motor cooling fins
- Control Integration: Connect control systems according to specifications:
- Wire variable speed controls if equipped
- Integrate with water system interlocks
- Connect to emergency stop circuits
System Balancing and Testing
Proper commissioning includes comprehensive testing and adjustment:
- Initial Balancing: Adjust airflow distribution across the work surface:
- Set blast gates or dampers to create appropriate suction zones
- Balance peripheral vs. central extraction
- Optimize for typical working patterns
- Performance Verification: Test actual capture effectiveness using:
Smoke testing to visualize airflow patterns
Anemometer measurements at critical points
Particle counting during test grinding operations
The following measurements should be verified across the work surface:
Zone Target Air Velocity Acceptable Range Purpose Primary work area 200-250 fpm 175-275 fpm Main particle capture Peripheral zones 150-175 fpm 125-200 fpm Containment barrier Operator breathing zone 50-75 fpm 25-100 fpm Personal protection Surrounding workspace <25 fpm 0-40 fpm Prevent disturbance
- System Validation: Document baseline performance metrics:
- Static pressure at key measurement points
- Airflow rates at various system settings
- Sound levels during operation
- Capture efficiency under standardized test conditions
Integration with Water System
Ensure proper coordination between water and air systems:
- Sequential Operation: Configure startup/shutdown sequencing:
- Typically ventilation starts before water flow
- Ventilation continues briefly after water shutdown
- Emergency stops affect both systems simultaneously
- Interference Prevention: Verify that water spray patterns don’t compromise ventilation:
- Adjust spray angles to avoid direct impingement on extraction points
- Balance water flow to complement rather than fight airflow patterns
- Create cooperative capture zones where both systems enhance each other
Industrial hygienist Dr. Elaine Hsu emphasizes that “Comprehensive dust collection testing during initial setup provides the benchmark against which future performance can be measured. This baseline establishment is invaluable for preventative maintenance scheduling and regulatory compliance verification.”
The proper integration of dust collection with wet grinding functionality creates a synergistic system where each component enhances the other’s effectiveness. With ventilation properly connected and tested, your wet grinding station now provides complete protection against both water-captured and airborne contaminants.
Step 7: Final Adjustments and Safety Checks
The culmination of your wet station grinding table setup involves comprehensive fine-tuning and safety verification. This critical phase transforms a merely assembled unit into a finely calibrated system ready for safe, efficient operation. Rushing or skipping these final adjustments often leads to suboptimal performance and potential safety concerns.
Throughout my career managing industrial fabrication operations, I’ve found that this final step separates professional installations from problematic ones. The attention to detail during these final checks often determines whether a system will require constant adjustment or operate reliably for years.
System Synchronization
Begin by ensuring all systems operate in harmony:
- Operational Sequence Verification: Test startup and shutdown sequences:
- Confirm dust collection activates before water systems
- Verify proper water pressure before grinding operations can begin
- Test emergency stops to ensure they deactivate all systems simultaneously
- Interlock Functionality: Verify safety interlocks prevent operation under unsafe conditions:
- Low water level protection
- Filter pressure differential limits
- Overload protection on all motors
- Control Response Testing: Check all manual and automatic controls:
- Ensure smooth, responsive adjustment of water flow
- Verify dust collection speed controls (if equipped)
- Test any programmable functions or presets
Fine-Tuning Performance Parameters
Optimize all adjustable aspects of the system:
- Water Distribution: Fine-tune spray patterns based on test grinding:
- Adjust nozzle positions to address any dry spots identified
- Balance flow between different zones based on capture effectiveness
- Set minimum effective flow rate to conserve water while maintaining performance
- Airflow Optimization: Make final ventilation adjustments:
- Fine-tune blast gates or dampers to create ideal capture zones
- Adjust hood positions if articulating system is installed
- Balance makeup air to prevent negative pressure issues in the workspace
- Work Surface Customization: Make final modifications to the work area:
- Install any needed dedicated fixtures for common operations
- Add reference marks or guides for consistent positioning
- Apply any final protective treatments to exposed metal surfaces
Comprehensive Safety Verification
Conduct thorough safety checks before releasing the system for production use:
- Electrical Safety: Verify all electrical components:
- Test GFCI protection on all circuits
- Confirm proper grounding of all metal components
- Inspect all connections for proper strain relief and protection
- Mechanical Security: Check all mechanical elements:
- Verify guards are properly installed on all moving parts
- Confirm all fasteners are properly tightened to specifications
- Test stability under various loading conditions
- Emergency Systems: Validate all emergency features:
- Test emergency stop functionality from all positions
- Verify water shutoff operates correctly
- Ensure clear access to all control points
Documentation and Baseline Establishment
Create comprehensive documentation for future reference:
- Performance Metrics: Record baseline measurements:
- Water flow rates at various settings
- Static pressure readings at test points
- Airflow velocities across work surfaces
- Filtration pressure differentials when clean
- Configuration Details: Document all adjusted settings:
- Valve positions for optimal operation
- Control panel settings and presets
Frequently Asked Questions of Wet station grinding table setup
Q: What is a Wet Station Grinding Table?
A: A wet station grinding table is an essential tool in industrial settings, designed to safely and efficiently handle grinding, sanding, and polishing operations. It uses water to capture and suppress airborne contaminants, making it ideal for handling combustible dusts and materials that pose fire or explosion risks.Q: What are the key components of a Wet Station Grinding Table?
A: The key components include a sturdy work surface, typically made of steel or stainless steel, an air plenum, and a filtration system that uses water to capture contaminants. The system is powered by a robust motor and blower assembly.Q: How does a Wet Station Grinding Table differ from a Dry System?
A: Wet systems use water to capture contaminants, making them effective for handling combustible dusts and reducing fire risks. Dry systems rely on air filters and are more versatile but may not mitigate fire risks as effectively.Q: What are the benefits of using a Wet Station Grinding Table?
A: The benefits include enhanced worker safety by capturing airborne contaminants, improved productivity, and compliance with safety regulations. Wet systems are particularly effective in industries handling hazardous materials.Q: What maintenance is required for a Wet Station Grinding Table?
A: Maintenance involves regularly checking and refilling the water reservoir, ensuring proper airflow, and disposing of sludge or water used in the process. This helps maintain efficiency and safety.Q: How do I set up a Wet Station Grinding Table correctly?
A: Setting up a wet station grinding table involves ensuring the work surface is level, connecting the water supply, and configuring the filtration system. It’s crucial to follow a step-by-step guide, like the 7 steps outlined in the setup process, to ensure proper installation and operation.External Resources
- Tri-Mer Wet Station Downdraft Grinding Tables – Features wet station downdraft grinding tables with grated work surfaces and optional height-adjustable workstations, designed to capture dust and fines efficiently.
- Air Purification, Inc. Wet Downdraft Tables – Offers wet downdraft tables that eliminate dust and particulates by using water, providing a safer working environment and reducing fire risks.
- DualDraw Downdraft Tables – Includes the “WC” series with water filtration for combustible dust, providing efficient dust capture and safety features.
- How It’s Made: Wet Downdraft Tables – A documentary video showcasing the manufacturing process of wet downdraft tables, highlighting their functionality and safety benefits.
- Porvoo Industrial Dry / Wet Station Downdraft Grinding Tables – Provides both dry and wet downdraft grinding tables, focusing on advanced filtration technology for efficient contaminant capture.
- Wet Downdraft Table Setup Considerations – A search result page offering various resources and considerations for setting up a wet station grinding table, including safety guidelines and equipment recommendations.
